Adult Spider-Man Mayday Beanie Crochet Pattern & Tutorial
- Purls & Top Knots
- Jun 11, 2023
- 7 min read
Updated: Jun 21, 2023
If you've seen Spider-Man: Across the Spider-Verse or you are a Spider-Man fan, this beanie is the perfect project to make!

Mayday Parker wears this beanie, quite adorably in my opinion. It is fully crocheted and not too hard. I'd say it is an advanced-beginner pattern but I'm going to walk you through every step of this hat!
Here is the inspiration for this project:


Youtube Tutorial:
I have a YouTube tutorial for this beanie. If you need further explanation of any part of this pattern, check it out!
Yarn I used/recommend!
Red:
Red Heart Super Saver - Cherry Red (This is what I used!)
Blue:
Red Heart Super Saver - Royal (This is what I used!)
*Disclaimer: I participate in the Amazon Affiliate program. If you click on an affiliate link and make a purchase, I may earn commission at no cost to you.
Measurements:
This hat ends up measuring 24 inches in circumference, 11 inches across when laid flat and 7.5 inches from the center down to the front!
What you Will need:
Worsted/size 4/medium weight yarn in:
Red
Blue
White
Black
Crochet Hooks:
5.5mm
6.5mm
4.5mm
3.5mm
Tapestry needle
Scissors
Stitch markers
Stitches & Abbreviations
hdc = half double crochet
sc = single crochet
mr = magic ring
sl st = slip stitch
st = stitch
yo = yarn over
dec = decrease
Beanie:
*This pattern is for an adult sized beanie. For a child size beanie visit: Spider-Man Mayday Beanie Crochet Pattern - Child
I recommend using a stitch marker in the first stitch of each round to keep track of your stitches & rounds!
This pattern is worked in a continuous round. Do not join each round!
Gauge: After the fourth round, the diameter should measure 3.5 inches. Adjust hook size accordingly if too big or too small.
With a 5.5mm crochet hook and red yarn:
1. In a magic ring, hdc 8. Do not join round. (8)
2. (2hdc) in each stitch around. (16)
3. (hdc, 2hdc) around. (24)
4. (hdc 2, 2hdc) around. (32)
5. (hdc 3, 2hdc) around. (40)
6. (hdc 4, 2hdc) around. (48)
7. (hdc 5, 2hdc) around. (56)
8. (hdc 6, 2hdc) around. (64)
9-19. hdc in each stitch around. (64)
Do not fasten off, we will now start the left ear flap.

Left Ear flap:
1. hdc 16, ch 1, turn. (16)
2. hdc dec, hdc 12, hdc dec, ch 1, turn. (14)
3. hdc dec, hdc 10, hdc dec, ch 1, turn. (12)
4. hdc dec, hdc 8, hdc dec, ch 1, turn. (10)
5. hdc dec, hdc 6, hdc dec, ch 1, turn. (8)
6. hdc dec, hdc 4, hdc dec, ch 1, turn. (6)
7. hdc dec hdc 2, hdc dec, ch 1, turn. (4)
8. hdc dec 2, ch 1. (2).
Fasten off & cut yarn.

Right Ear Flap:
Note: the right ear flap is one round shorter to account for the slanting that happens when working in the round.
Skip 11 stitch around the back of the beanie and re-attach yarn in the 12th stitch.
1. ch 1, hdc dec, hdc 12, hdc dec, ch 1, turn. (14)
2. hdc dec, hdc 10, hdc dec, ch 1, turn. (12)
3. hdc dec, hdc 8, hdc dec, ch 1, turn. (10)
4. hdc dec, hdc 6, hdc dec, ch 1, turn. (8)
5. hdc dec, hdc 4, hdc dec, ch 1, turn. (6)
6. hdc dec, hdc 2, hdc dec, ch 1, turn. (4)
7. hdc dec 2, ch 1. (2)
Fasten off & cut yarn.

Using a 5.5mm crochet hook and blue yarn:
1. Attach yarn to any bottom stitch.
2. Sc evenly around the bottom of beanie and ear flaps.
3. Sl st into first blue stitch to join.
Fasten off & cut yarn. Weave in any ends.

Eyes: (Make 2)
Note: I used a bigger hook for the eyes to make them look slightly spaced out like Mayday's do. If you want a tighter look, size down your hook to 5.5mm or 5mm
This pattern is worked in a continuous round. Do not join each round!
With a 6.5mm crochet hook and white yarn:
Round 1:
1. Chain 5
2. 3sc into the 2nd chain from the hook.
3. sc in the next 2 chains.
4. 3sc into the last chain.
5. Rotate your work so that you are now working into the other side of the foundation chain and sc into the next 2 chains
Round 2:
1. (2sc) in the next 3 stitches.
2. sc into the next 2 stitches.
3. Repeat steps 1 & 2 again.
Round 3:
1. (2sc in the next stitch, sc in the next stitch) 3 times.
2. sc into the next 2 stitches.
3. Repeat steps 1 & 2 again.
Round 4:
1. (2sc into the next stitch, sc into the next 2 stitches) 3 times.
2. sc into the next 2 stitches.
3. Repeat steps 1 & 2 again.
Round 5:
1. (2sc into the next stitch, sc into the next 3) 3 times.
2. sc into the next 3 stitches.
3. Repeat steps 1 & 2 again.
4. Sl st into the next stitch to join.
Fasten off & cut yarn.
With a 4.5mm crochet hook and black yarn:
Round 6:
1 Attach yarn to any outside stitch.
2. sc in each stitch around.
3. Sl st into first black stitch to join.
Fasten off & cut yarn. Weave in any ends.

Attaching the eyes:
With a tapestry needle and black yarn:
1. Attach the eyes to the lower center of the front of the beanie with stitch markers to ensure you like the placement prior to sewing.
Tip: I like to angle my eyes slightly opposite each other to look more like Spider-Man's eyes.
2. Using a running stitch, sew around the eyes to secure them to the beanie.
Knot the remaining yarn tail to the starting yarn tail. Weave in any ends.

Webbing:
Note: You can do the webbing however you want to! I will attach a diagram I loosely followed for mine that I made from various pictures from the movie.
For a better explanation on this, watch my YouTube tutorial.
Diagram:


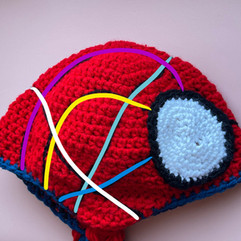
Each color is a different surface stitch line I made. This is just to help you visualize where each line begins on the front and ends on the side/back but you can do your webbing however you want!
Tip: Keep tension loose to avoid the project from bunching! If your project is bunching, you can also size up your hook to 4.5mm.
With a 3.5mm crochet hook and black yarn:
The webbing is done using surface crochet stitches.
To surface crochet:
1. Insert your hook into the stitch you want to start in and pull through a loop of the black yarn from the inside of the hat.
Tip: I make a slip knot and pull that through as my first loop! This is not necessary but it makes the work feel more secure.
2. Insert your hook into the next stitch you wish to surface crochet into and pull through another loop. There should be two loops on your hook now.
3. Pull the second loop through the first loop (like a slip stitch) to make your first surface crochet.
4. Continue doing this along any lines you want to create!
5. When you get to the end of your surface crochet line, simply cut the yarn and pull it through to fasten it.
Tip: I like to feed the tail back through the the inside and weave in my ends to secure.
Weave in all ends to secure surface stitch lines.


Braids:
Note: You can make the braids as thick or as thin as you want! Adjust the number of strands of yarn you use to do so. The appearance of the braids can also be adjusted based on how loose or how tight you braid them. I like to do mine looser so they look more full.
For a better explanation of this, watch my YouTube tutorial.
Here is an example of two braids with different amounts of yarn strands. The braid on the left has 7 strands of each color, the braid on the right has 14.
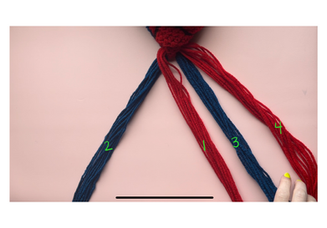
With blue and red yarn, scissors, and a measuring tape:
1. cut an equal amount of yarn strands in each color to 48in. (I use 12 strands of each color for each side)
2. Feed the yarn into the bottom of stitches of the ear flap. Center the strands so that the ends are the same length (approximately 24in. each)
3. Pull the color you want to start with above your secondary color. (I used red as my primary color and blue as my secondary)
4. Lay your sections out so that red is on the outside and blue on the inside.
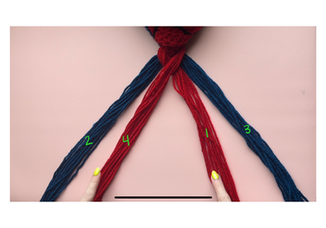
If you've ever fishtail braided, that's basically what we are going to do!
5. Taking the left red section and pull it over the left blue section and into the center. Take the right red section and pull it over the right blue section AND the other red section.
Now you should have the blue sections on the outside and the red sections on the inside.
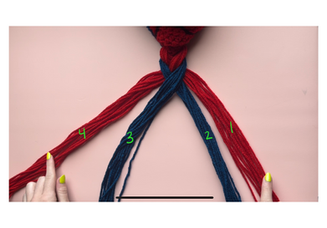
6. Repeat the previous step but with the blue yarn. Left blue section crosses over the left red section into the middle, right blue section crosses over the right red section AND the other blue section.
7. Repeat as long as you want your braid to be. (I did this 12 times.)
8. Once your braids are as long as you want them, gather all the yarn together and make one big overhand knot to secure. Make sure you pull the knot tight so it doesn't come undone.
9. Cut the remaining strands to equal length.
10. Repeat on the other ear flap.
Picture Diagram:


All done!

Your final beanie should look something like this!
I love that this pattern allows you to customize the beanie to your preference with the webbing, braids, etc.
If you've stuck through this far, thank you so much for reading my pattern!
If you make your own Spider-Man beanie be sure to tag me in your finished product on social media! They are all linked down below but it is @purlsandtopknots on all of them!
If you have any questions, feel free to comment them down below or reach out to me on social media.
happy crafting!
Please do not copy or sell patterns I have designed for a commercial gain.
I do give permission to sell items you create using my patterns. Please give me, @purlsandtopknots, credit for designing the patterns.
